What if every pre-listing consultation you booked was a success? Imagine a 100% close ratio 🙂
The in-person listing presentation is a critical step on the long, precarious road towards homeownership. Sellers must be convinced that you are the right realtor that they can trust.
And you only get one chance to win their trust.
So when you schedule an in-person appointment, make sure you follow these tips to make the most of it.
A strong pre-listing presentation can vastly improve your conversion rate, and turn your listing consultations into productive meetings. Creating a great one, of course, takes time, but, once it’s done, you’ll have a template for the future.
What Is A Pre-Listing Presentation?
Research by NAR points clearly to the fact that an overwhelming 70% of homeowners interviewed ONLY 1 agent. So, if your pre-listing presentation is lackluster, it’s unlikely you’ll win their business during an in-person consultation.
The goal of a pre-listing presentation is NOT to sell you or your agency. It’s not to promote your brand either.
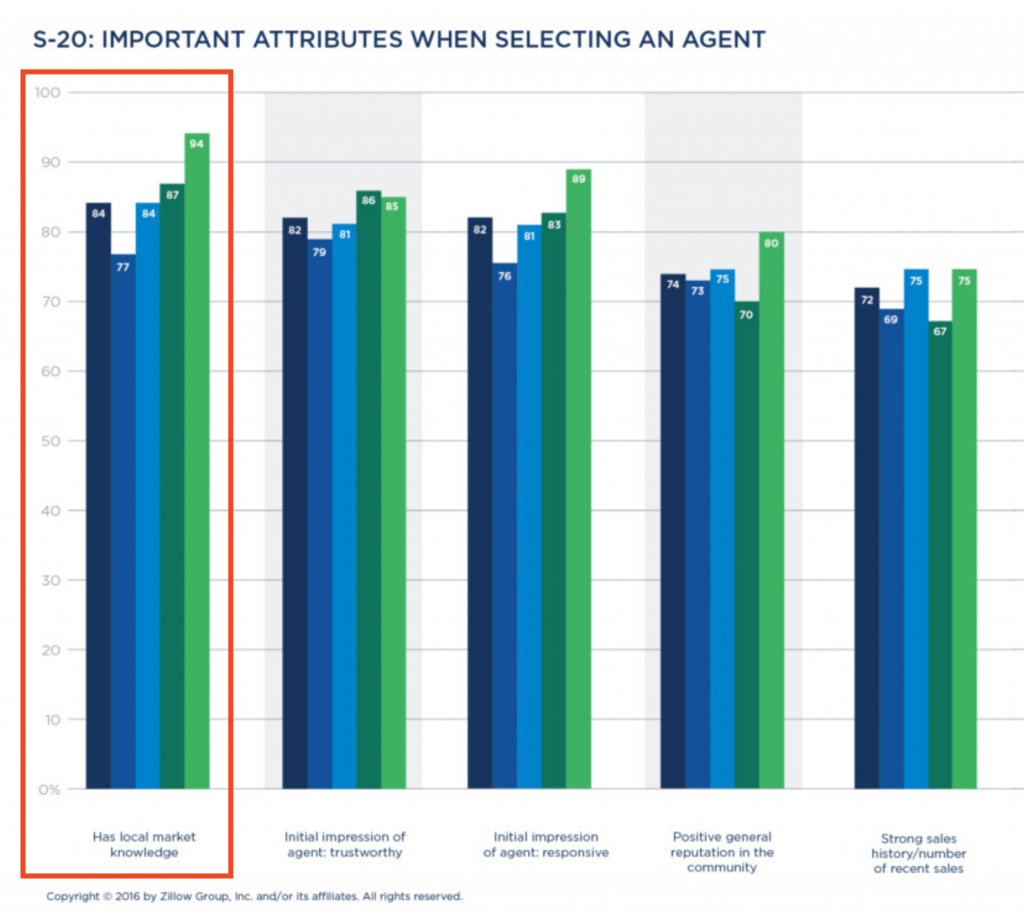
A pre-listing package or presentation is a marketing tool that informs prospects of your unique qualifications and expertise as a real estate agent. The collateral contained in your pre-listing package should convince prospective homeowners that your strategy for selling their property or finding their dream home will work for them. Zillow’s 2016 survey found out that local market knowledge is the number 1 factor when selecting a real estate agent.

Zillow Survey Results When Selecting A Local Agent
Factors Contributing To The Credibility Of Your Local Market Knowledge:
- Recently sold homes in the area
- Local testimonials
- Local brand for your real estate brand (online)
Your pre-listing package should cover four key topics:
- Your marketing strategy – demonstrate why your strategy works
- Knowledge of the housing market – educate clients about local market conditions
- Professional real estate expertise – ability to guide clients through each legal step
- Character traits – trustworthiness, transparency, integrity
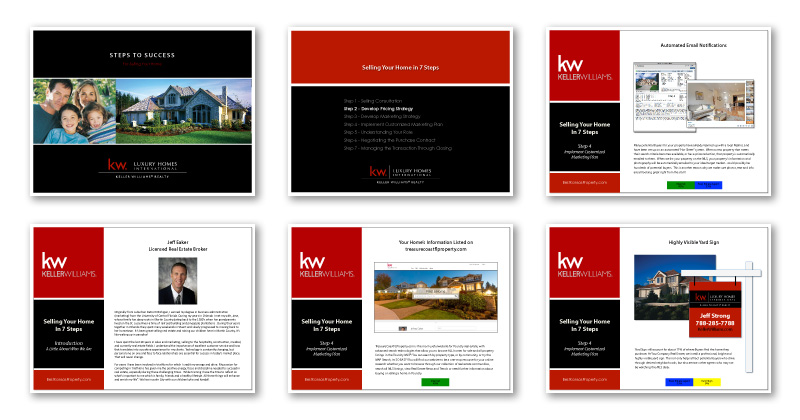
Everything you include in the pre-listing package (ie photos, infographics, housing data) should be there to support the goal of presenting your unique value proposition.

Benefits of a Professional Looking Pre-Listing Presentation
Spending time on a polished pre-listing presentation benefits real estate professionals in a number of ways:
- Saves you time and reduces the risk of canceled, failed in-person appointments.
- Distributing copies allows you to reach more people at once
- Qualifies prospects before the meeting
- Provides prospects with valuable marketing data
- Reaches prospects before they are aware of a need and raises brand awareness

5 Tips To Creating A Pre-Listing Presentation
1. Keep It Simple
Your pre-listing package should educate prospects, but there’s a lot of information to digest. Try not to overwhelm clients with technical data. Simplify your content with bullet points, graphs, and other visual aids. Avoid using technical terms that your client doesn’t need to know immediately.
2. Be Strategic
Distributing your package to prospects with no interest is a waste of time. Create a drip campaign to gauge interest from your contacts. Create a customized pre-listing package for each segment of your marketing database. If you are presenting multiple areas, use colors to distinguish separate neighborhoods.
3. Know Your Audience
Who is seeking to prospect? Are you focused on first-time buyers? Sellers moving from a home to a condo? Make it clear who your pre-listing package is aimed at. Learn the unique pain points of your target market so you can craft marketing copy that appeals directly to them.
4. Include Testimonials With Pictures & Videos Of Your Clients
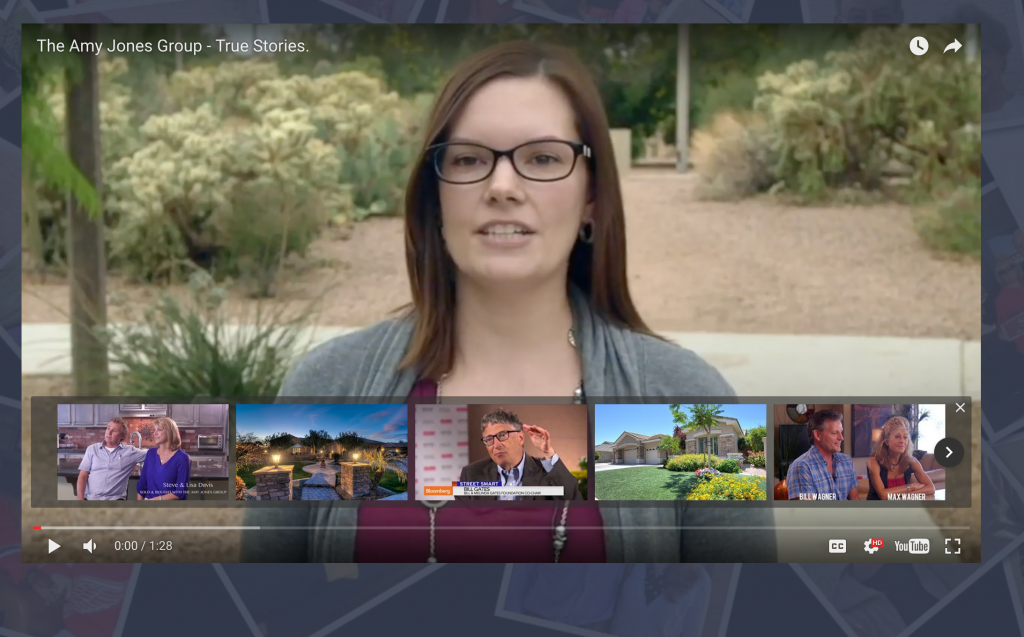
Trust is the key to any relationship. Asking potential home buyers or sellers to trust you with their investment needs some persuasion. Like star ratings for hotels or businesses, your testimonials are proof that people are willing to vouch for you. Heartfelt testimonials offer your prospects some insight into what they can expect if they choose you as their real estate agent. Make sure that the testimonials are easier to read and each of them has a picture attached to them. Including pictures of other happy clients instantly improves the credibility of your testimonial page. If you can get to shoot a video of your client experience after you close a deal, you can easily repurpose those videos to impress your prospects.

5. Use High-Quality Images
High-quality photos of past clients you’ve helped, homes you’ve sold, and people you work with can make a huge difference to your pre-listing package. Consumers respond to images more favorably than text.
How To Create a Polished Pre-Listing Presentation
Step 1: Choose a Strong Title.
Great marketing appeals to the emotions of your audience. What do buyers want? What do sellers look for? If you think of what your prospects are looking for, use those keywords in your title. Position your title like a call-to-action that motivates your prospects to take action as well:
“Buy Your Dream Home At Last”
“Sell Your Home Without The Stress.”
“Succeeding In The Buyers’ Market”
Step 2: Use a high-quality team photo or professional profile image.
63% of consumers indicated that an image is more impactful than a product description. You don’t have to be a model, but the image you use should be of the highest resolution and quality. Poor pixel quality makes you look second-rate and doesn’t inspire confidence. Your photo image has more of an impact than you think.
Step 3: Create the content
The content of your pre-listing package should include the following collateral:
Cover Letter
Your unique selling proposition is your chance to show prospective sellers and buyers what makes you different and why.
Agent Bio
Imagine you’re meeting a prospect casually over coffee. What would you tell them about yourself? Tell them about your past, your reason for becoming a real estate agent, as well as your personal and professional goals. We can put prospects at ease before the in-person meeting if they know something about our personal history and preferences.
Sales Flow
Describe the sales process step by step using a flow chart that clearly illustrates the entire buying or selling cycle. Transparency now will save you and your potential client headaches down the road.
Steps to Selling or Buying A Home
Most clients, especially first-time home buyers and sellers, need guidance and information about the process. Create a flowchart that walks your clients through each step. Provide them with an estimated timeline. You can manage their expectations more effectively, and ease the anxiety of clients if you prepare them in advance for the challenges they will face.
Marketing Strategy
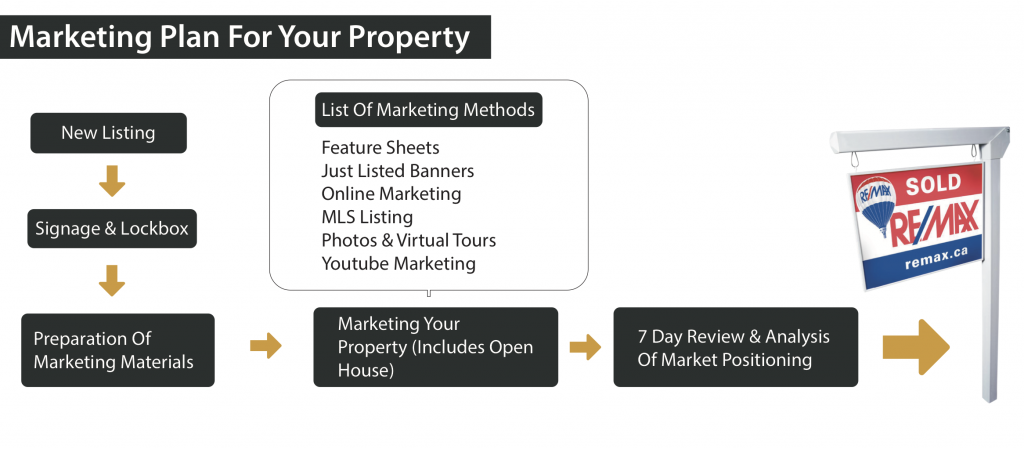
Provide your prospects with a clear flow chart or visuals that depict your marketing strategy for selling their home. Social media, flyer-ing, print ads – specify the marketing channels you use and why. Outline the return on investment for each channel and the estimated exposure/reach of each channel. Assure your clients that your marketing will target the right audience.
Relevant Housing Market Data
Use infographics, charts to help your clients understand current market conditions, as well as trends that could impact the market during the buying or selling process. Include local business and neighborhood data as well, to give clients further insight into the community they will be joining.
Resources
A lone wolf doesn’t inspire as much confidence as a team. Clients will be more confident in choosing you as their agent or broker if they know you have a strong team behind you. Let your clients know how you’ll be using your sphere of influence to help them reach their goals. Include a contact list of the people you work with: stagers, photographers, other agents, and vendors.
Seller Tips/Showing Tips
List 5 – 10 useful, practical tips that will help your clients get an edge on the competition. The tips you provide are your opportunity to demonstrate your experience with selling or buying homes. Share anecdotes from successful sales in your past. Use images when applicable.
Step 4: Include A Client Checklist.
Provide your prospects with a checklist to help them prepare their home for sale or a checklist of their dream home attributes. Create a document that clients can use to make sure their documents are in order before your meeting and that they meet the criteria for an in-person listing consultation. The checklist should include paperwork your clients will need: a seller’s disclosure form, mortgage statements, HOA documents, title deeds, etc. You’ll be able to qualify prospects before the meeting and save time.

Example listing marketing plan illustrated for a potential client
Step 5: Go Heavy With Personal Branding
This is something that many Realtors often overlook. You must be thinking that they already know you, why bother branding the listing presentation?
Well, let me tell you something about presentation psychology. The more branded your presentation, higher is your chance to get the listing. This means you should include a nice cover image for the listing presentation as well as have social media links. Do this even if you are going through a paper presentation.
Getting Help To Improve The Listing Presentation
Often times many realtors do not have the time or the skillset to design a custom PDF presentation template that they can use for their appointments. We recommend that you spend a few hundred dollars and hire a professional graphic designer on sites like UpWork or Freelancer. Trust me it’s worth the money.


