Introduction
Marketing your real estate expertise on YouTube and Facebook can be highly effective as a lead generation tactic. Few agents, however, fully appreciate the complete range of video features available to them on these two monolithic platforms.
With the growth of online video consumption, real estate agents can reach prospects in a number of ways. Open-house virtual tours, buyer/seller tutorials, testimonials, and consultation videos are just some of the content that appeals to online prospects.
Whether you’re a brokerage producing video content weekly for clients, or a solo agent seeking to grow your YouTube channel, we’ll share with you some simple yet effective tricks, features, and hacks to maximize your video marketing.
Benefits of video marketing for real estate
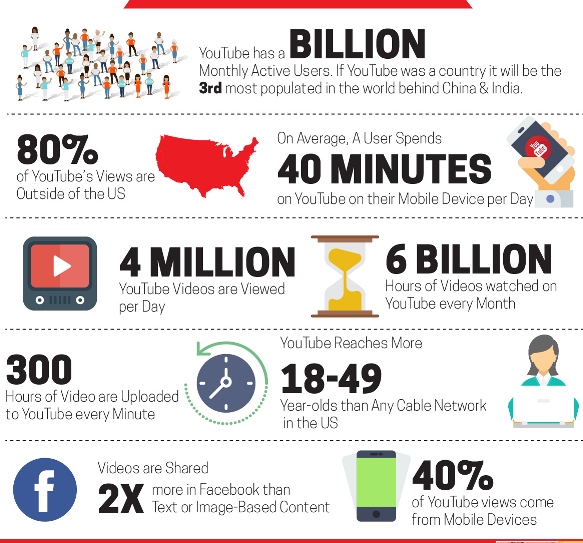
85% of US audiences are either streaming a video or live event daily! Facebook alone generates 8 billion video views each day! With so many users and so much content – over 500,000 million hours – staying visible can be tricky.
Fortunately, only 12% of real estate agents are engaged in producing video content. That means your videos won’t have much competition online from local competitors. Your videos have a great chance of being discovered if you are strategic.
Maximizing your exposure on either YouTube or Facebook will enable you to capture a larger share of the local market. By optimizing your video content on these two platforms, you’ll:
- Reach more local home shoppers: 72% of consumers prefer to learn about a brand or product through a video. There are SEO tricks that will make it easier for you to dominate search results on YouTube.
- Improved ROI for your video production: Video marketing generates 66% more qualified leads annually. By improving your online visibility, you generate more traffic, more leads, and improved conversion. This, in turn, raises the return on your investment.
- Grow your subscriber list: If your content is frequently showing up at the top of search results, you stand a higher chance of attracting subscribers. More contacts in your CRM to cultivate and build relationships with!
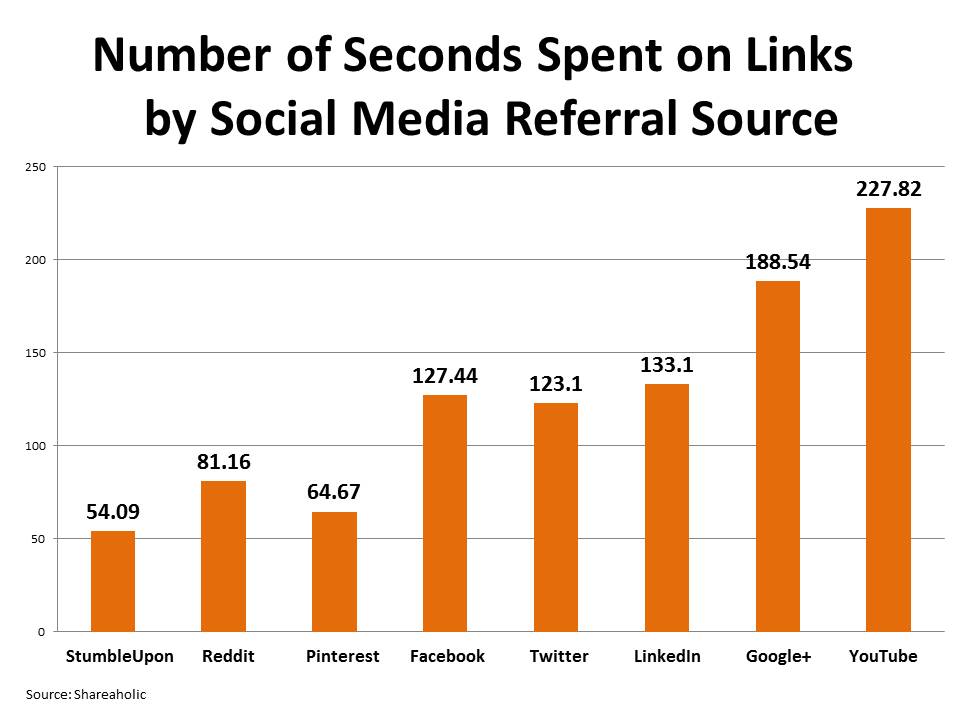
- Increased sharing: Even after your video or live stream content has gone live, you can maximize your content to attract more links and shares of your content. As your shares increase, so does your SERP ranking.
- Better branding: All of these benefits boil down to better brand recognition for you. During their research, local home shoppers searching online will see that you dominate search results.
Are you ready to start maximizing your video marketing? Choose from our list of features below to give your real estate videos and live streams a boost!
Section 1: Youtube Features To Maximize Your Video Marketing
-
- Customize your YouTube URL
- Use YouTube Enhancements to add creative effects
- Create a transcript of your video or use the auto transcript feature for Facebook
- Upload a transcript of your video to get discovered
- Add an end-screen to your video to promote similar videos
- Explore YouTube royalty-free audio library
- Live stream an event to YouTube
- Find popular Youtube real estate search topics using Google Trends
YouTube Features Explained…
#1) Custom YouTube URL
A customized URL is like having your own domain name for each video you produce. You can add strategic keywords or use your company name/branding that will make your content unique.
To be eligible for your own URL on YouTube, you need to work your way to 100 subscribers or more. Your account must be older than 30 days, and you must also have uploaded channel art and a photo for your icon.
Your custom URL must be approved before it’s assigned, and it’s permanent. So you need to be 100% certain that the URL you choose is the one you want.
If you qualify, follow the steps below to customize your YouTube URL:
-
- Open your Youtube ‘Account Settings’
- Select ‘Advanced’ from the Name section.
- Under ‘channel settings’ click on ’You’re eligible for a custom link – click here’. This will only appear if your account is eligible. If you don’t see it, you’re not eligible yet.
- Next, click on ‘I agree to the Terms of Service.’
- Customize your URL and click ‘Change URL’.
- Once YouTube approves of your change, you’ll be notified of the option to ‘Confirm choice’.
Remember, you can’t request to change your URL again after a change has been confirmed.
#2) YouTube Enhancements
Several enhancement tools are available to add creative flair to your video. Features include:
-
- Timelapse
-
- Slow-motion
-
- Custom blurring
-
- Timed-out parts of the video
-
- Apply Filters
-
- Rotate View
-
- Stabilize shaky camera movements
- Auto-fix lighting/color
Follow these steps to access the YouTube enhancement features for your video content:
-
- Log in to your YouTube account.
- Click on your channel icon. In the top right click ‘Creator Studio’. On the left, select ‘Video Manager’.
- Next, select the video you’d like to edit, then click ‘Edit > Enhancements’.
- Make your changes using the features available.
- Click on ‘Save’ to finalize.
#3) Create your own video transcript
Did you know YouTube automatically generates a transcript of any video you upload? Yep. To view the transcript of any video:
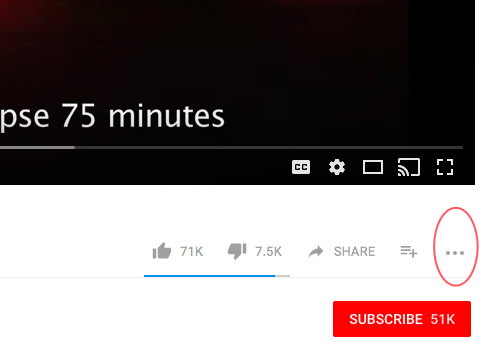
- Select any video on YouTube. On the bottom far right corner of the viewing window, you’ll notice 3 horizontal buttons. click on them to access ‘More’ options.
- Next, click the ‘Transcript’ option that appears.
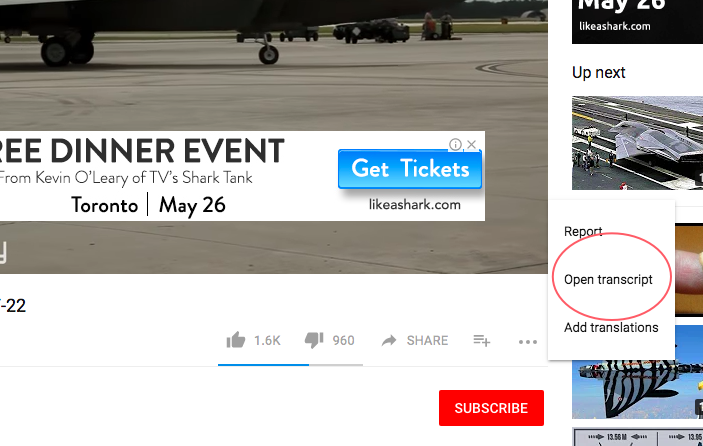
It’s that simple!
#4) Upload Your Own Transcript
If you upload your own transcript, even better. You can optimize your transcript using keywords that your audience might use to search for your content. For example, if you are targeting beachfront properties, you might script an introduction to your video that uses the keyword.
To upload your own transcript, follow this helpful tutorial by YouTuber James Wedmore:
#5) Add an end screen on your YouTube Video
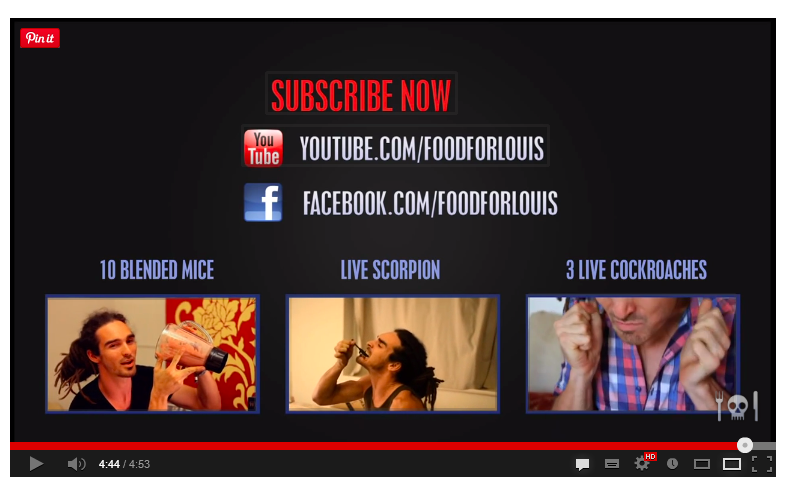
More advanced marketers for real estate teams or brokerages can add an end screen in the final frames of your video. End screens can be customized to promote similar content of your own that may not be on YouTube.
End-screens act like call-to-action buttons and can direct traffic from your YouTube videos to other similar content you’re promoting.
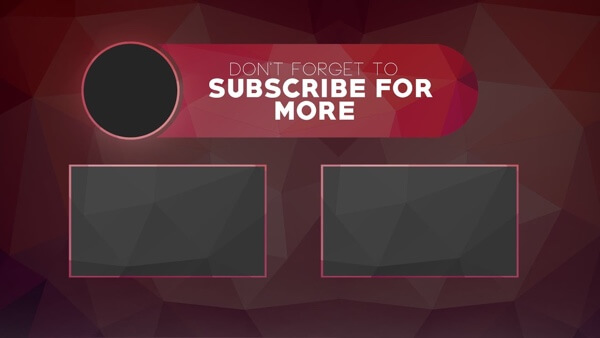
Example of a YouTube end screen template
Instead of the suggested viewing on the right, viewers can click directly on your video content to watch other videos or a special promotion you’re offering.
-
- In the top right of your account, click on your account icon > ‘Creator Studio’.
- Select Video Manager > Videos, which you should see on the left menu.
- Once you select the video, click ‘Edit’.
- Click ‘End Screen’ in the tab bar along the top.
- Your video will appear with a predefined grid template and a timeline below that indicates the available part for the end screen.
- Click ‘Add element’. You can add up to 4 elements, but at least one of them must be a video or playlist.
- There are 3 ways to build your end screen:
-
- Add element: Select each desired element, fill in the required fields, then click ‘Create element’. Remember, at least 1 has to be a video or playlist.
-
- Copy from video: Copy an end screen from another of your videos, then edit as desired.
-
-
- YouTube template: Choose from a range of templates with varying combinations of elements. You can customize the placement and size of each element. You can also ‘Adjust the time’ for the element to show in the timeline below.
-
- Save your design.
YouTube videos support either annotations or end screens, not both. You can remove previously published annotations from which are not mobile-enabled.
5-minute YouTube End Screen Tutorial
#6) YouTube Audio Library
You can upload a video from your smartphone/iPhone, add creative enhancements and audio! Over 1000 royalty-free audio tracks are available from the YouTube Audio Library.
There are even ad-supported popular songs that you can use to make your content stand out. Popular songs that comply with artist/label licensing agreements can be used without penalty.
-
- Log in to your YouTube channel.
- Click on your channel icon.
- Access the Creator Studio > Create > Audio Library.
- From the tabs along the top of the page, choose from either ‘Free music’ or ‘Sound effects’.
- When you find a track you like, click the arrow to download.
#7) YouTube Live Stream
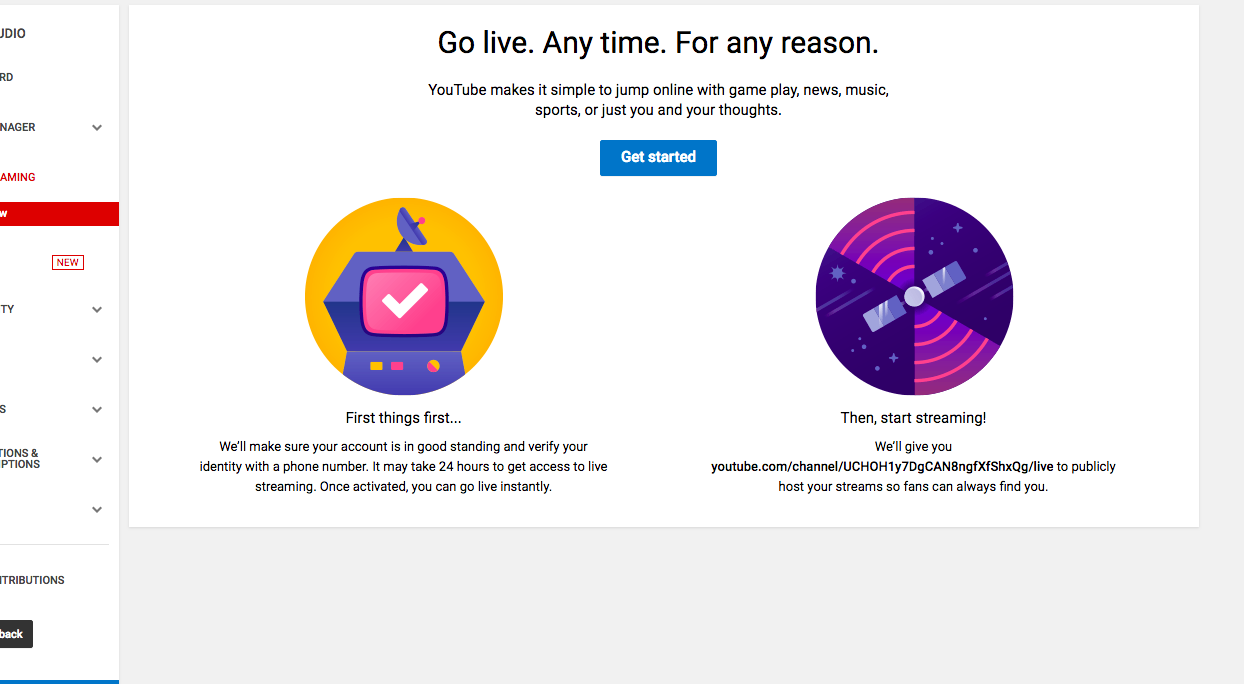
Your YouTube channel includes live streaming options that can be accessed and enabled by your dashboard’s Creative Studio.
Before you start streaming live, however, you’ll need to set up your encoder. An encoder is a web-based software that compresses audio and video files so they can be easily streamed over the internet.
Once you login to your channel, simply click on the ‘Go Live’ button on your dashboard. You should notice there are 2 options for streaming on YouTube: ‘Stream Now’ and ‘Live Event’.
Video Marketing: How to stream a live event
-
- Download and set up your encoder using the Stream Name/Key and Server URL. Add a title and description in the BASIC INFO tab. You can also add a custom thumbnail that represents your event.
- Set privacy settings to either Public, Unlisted, or Private.
- In the ‘Stream Options’ tab, choose between ‘Low Latency’ or ‘Highest Quality’. Low Latency is closer to real-time for users, with the least drag. Highest Quality provides a seamless viewing experience.
- If you own the rights to the live show, check the “Mark archive unlisted when complete” box. This setting removes the archived live event from the search index once the event is over. You’ll still be able to share a link to the archived event, however.
Stream Now
This is the fastest way to stream an event. You copy the server URL and stream name into your encoder. You’ll need to stop and end the stream from your encoder.
If you have more than 10,000 subscribers, you can even stream directly from your mobile phone!
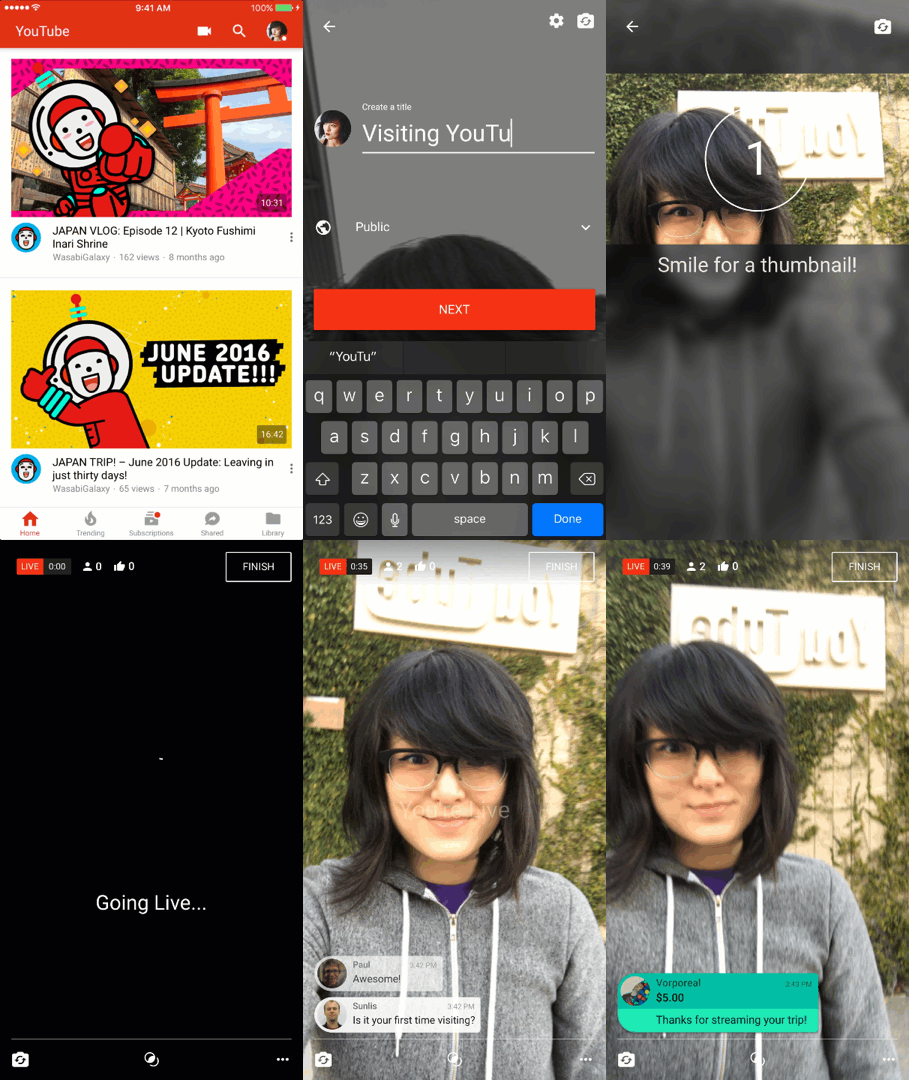
YouTube offers mobile streaming!
#8) Popular YouTube Search Trends
Insight into the most common search trends for real estate in your farm can help you create content that gets more views. It can also help you to optimize your video content for better search results.
Google Trends now allows you to access data on topics being searched on YouTube, not just Google.
When you access your free Google Trends Dashboard, you can either search a topic or explore a trending topic/story.
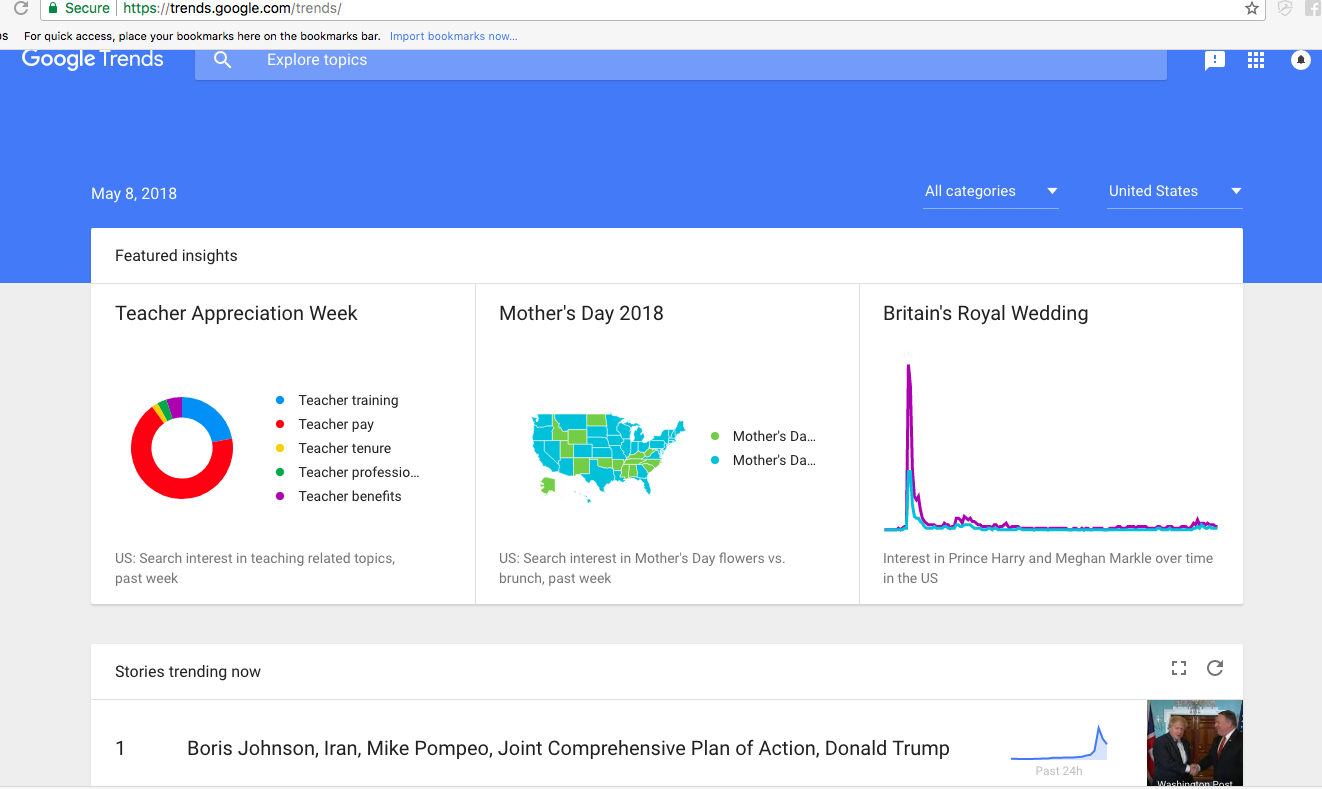
Use Google Trends to identify topics and keywords trending in your farm. Create video content around these topics to increase views and you’ll be sure to attract prospects from your farm!
Section 2: Facebook Video and Live Features For Real Estate
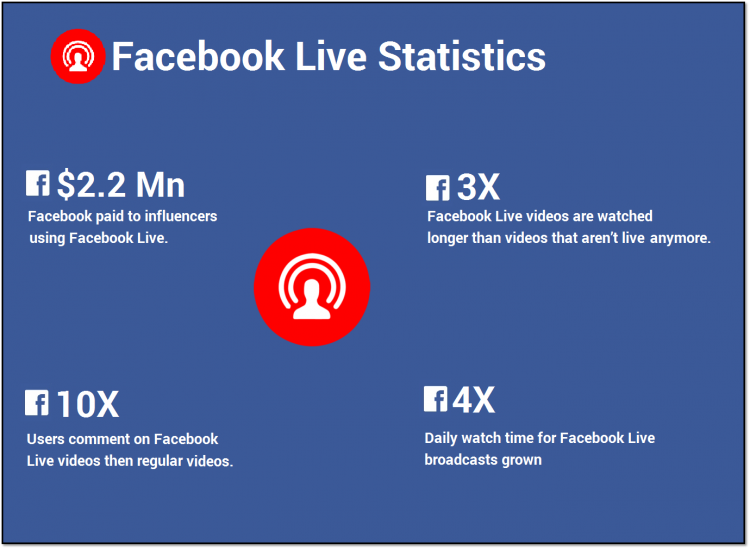
#1) Add Multiple Live Contributors
Do you have a team of contributors covering live, local events? Now you can add multiple contributors as Live Contributors, without assigning them as page administrators.
Previously, you were required to add contributors as admins to your page before they could broadcast your event in their feed.
With automatic crossposting relationships, you can assign local influencers, other agents, or strategic partners instant access to your live stream without making them page admins. Your content will play automatically on their feeds whenever you upload something new.
See our instructions for ‘Crossposting’ below for details.
#2) Pin comments to the bottom of your live feed
How to pin comments on your live feed:
-
- Log in to your Facebook Admin page.
- Click on ‘Live’, the icon directly beneath ‘What’s on your mind?’ button.
- Tap ‘Go Live’ to launch your broadcast.
- Click and hover over a comment. A menu box will appear with 3 options.
- Next, tap Pin this comment.
Use this feature to highlight comments from viewers that will motivate further engagement.
#3) Permalinks for easier sharing
A permalink will make it easier for search engines to find your video because you can add strategic keywords.
With a permalink, you don’t have to embed your Live event. You can share it after the event simply by amending the URL.
The format for permalinks will be as follows: facebook.com/pagename/videos.
#4) Crossposting to multiple pages
Facebook provides step-by-step instructions for posting your video to multiple pages after an event.
Follow these same instructions for adding multiple Live Contributors:
-
- Go to ‘Settings’ on your Facebook Admin Page.
- Select ‘Crossposting’.
- Type the Page name or Facebook URL and select it from the list.
- Select either an ‘Automatic Live’ crossposting relationship or a ‘Manual Live’ crossposting relationship.
- Click on ‘Allow [Page name] to crosspost the live video to your page without further approval’ to select an Automatic Live crossposting relationship.
- Choose ‘Require [Page name] crossposted live videos to be approved by one of your admins or editors before being crossposted to your Page’ to select a Manual Live crossposting relationship.
- Click ‘Next’.
Individuals you assign as contributors will automatically receive your live stream on their pages. Manual relationships, however, will need to either grant you permission or manually add you to their admin pages.
You can also read further details regarding Facebook contributors and crossposting.
#5) Video Insights (5000 or more followers)
Facebook will be adding additional viewing metrics for broadcasters with 5000 or more followers. The added audience demographics will give deeper insight into your engagement.
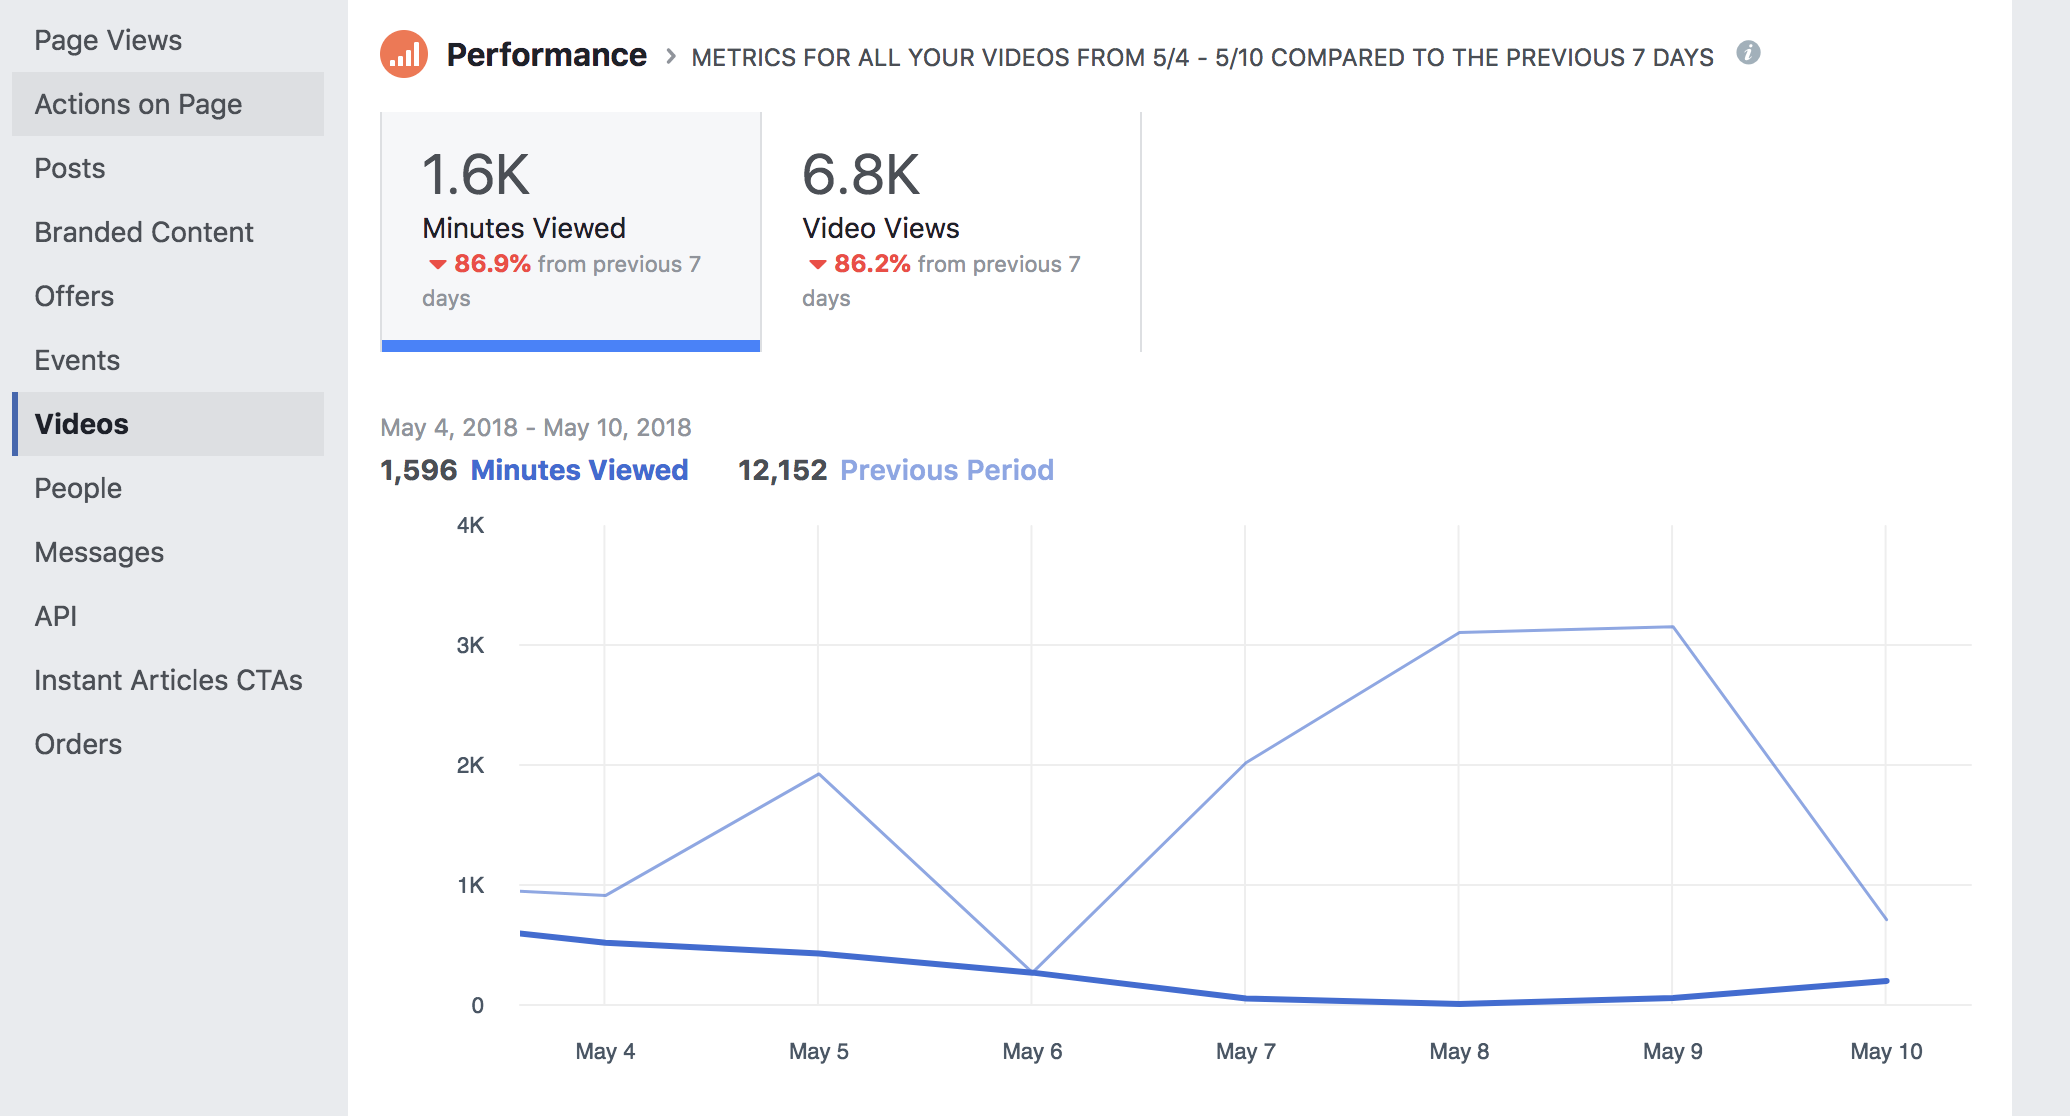
To view insights for all of your videos for:
-
- Click ‘Insights’ at the top of your Page.
- Click ‘Videos’, located on the left.
To see the insights for an individual video:
-
- Select ‘Publishing Tools’, located at the top of your admin Page
- Click ‘Video Library’ on the left.
- Select desired video.
Next, choose from the sections on the right to view details about the video’s performance:
-
- Minutes Viewed:
-
- 10-Second Views:
- Audience and Engagement (for videos with at least 100 views)
#6) Upload native content
Native content is anything you upload directly, instead of using a hyperlink or embedded content from another source.
You can upload videos directly to Facebook from your smartphone or desktop.
To share a video from your smartphone or a desktop folder:
-
- Click on ‘What’s on your mind?’ (at the top of your News Feed or timeline)
- Tap Photo/Video icon.
- Choose the video you want to share and click the ‘Done’ button or the camera icon to record a new video, and then click ‘Use’.
- Click ‘Next’ and then ‘Post’.
Facebook sends you an alert to let you know when it’s ready for viewing.
#7) Add call-to-action to your video marketing
Before you add a call-to-action button to your Facebook video, you need a landing page URL. Once your landing page is set up, you can add a call-to-action button to an existing video or create a new video.
You can either add a call to action directly into your video or in the description. If you want to add the CTA at the end of your Facebook video, here’s how:
Upload your new video or select an existing video.
2.) Click on the “Call to action’ link that appears.
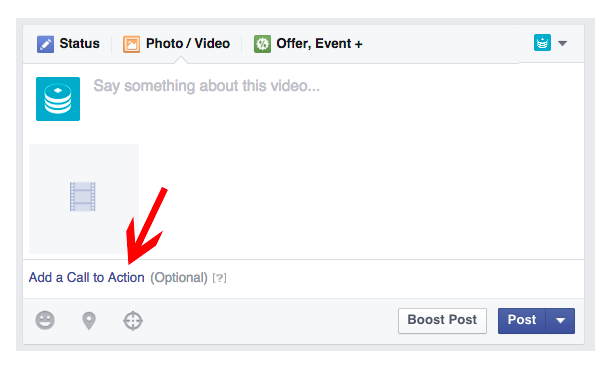
3.) Select the appropriate option for your CTA button:
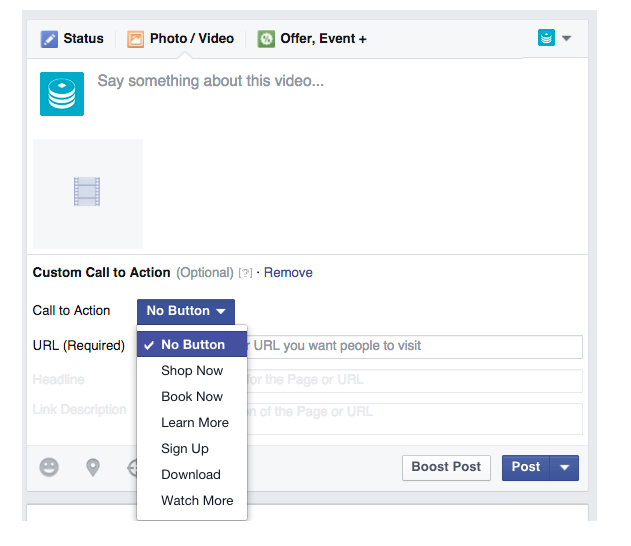
4.) Complete the additional required fields, including the landing page URL.
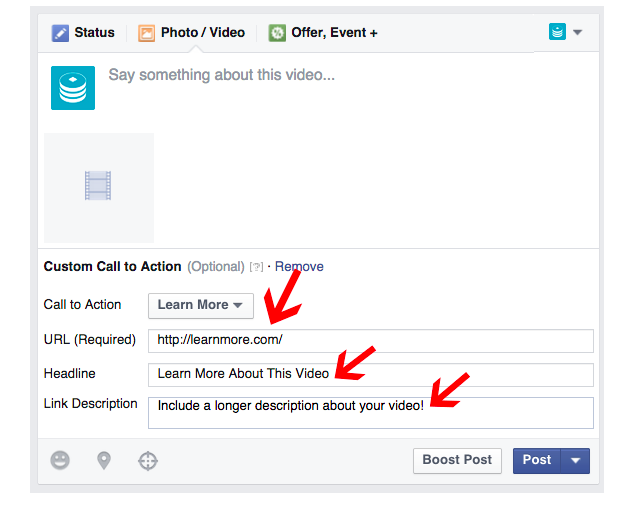
#8) Add A Featured Video
If you have a Facebook business page, you can add a featured video! The video will display prominently on your page at the top of the video feed.
You can create a permanent featured video to introduce visitors to yourself, or a new one each week. The featured video is always visibly displayed at the top of your video feed.
-
- Click on ‘Video’, located on the left panel of your Facebook admin page.
- Choose a video from the ‘Feature one of your videos’ button.
- Select ‘Add Featured Video’ button to finalize your choice.
YouTuber Kristen Somsa provides a 7-minute tutorial to show you how to add a featured video in detail:
Summary
Facebook and YouTube videos attract millions of viewers each day. Competition for visibility, however, is becoming increasingly more challenging as more content is added daily.
Whether you already have video content or you’re considering investing in video marketing, there are exciting features available on both platforms to maximize your reach and visibility. These features are free and designed to enhance your online appeal.
Use our tips to optimize your videos for improved visibility in search results. Target your local audience or farm, and you’ll quickly dominate video search results on Facebook and YouTube.
![16 Video Marketing Tips For Real Estate Professionals [2022 Edition]](https://localleader.com/wp-content/uploads/2018/05/video-tinkering-illustration.png)


